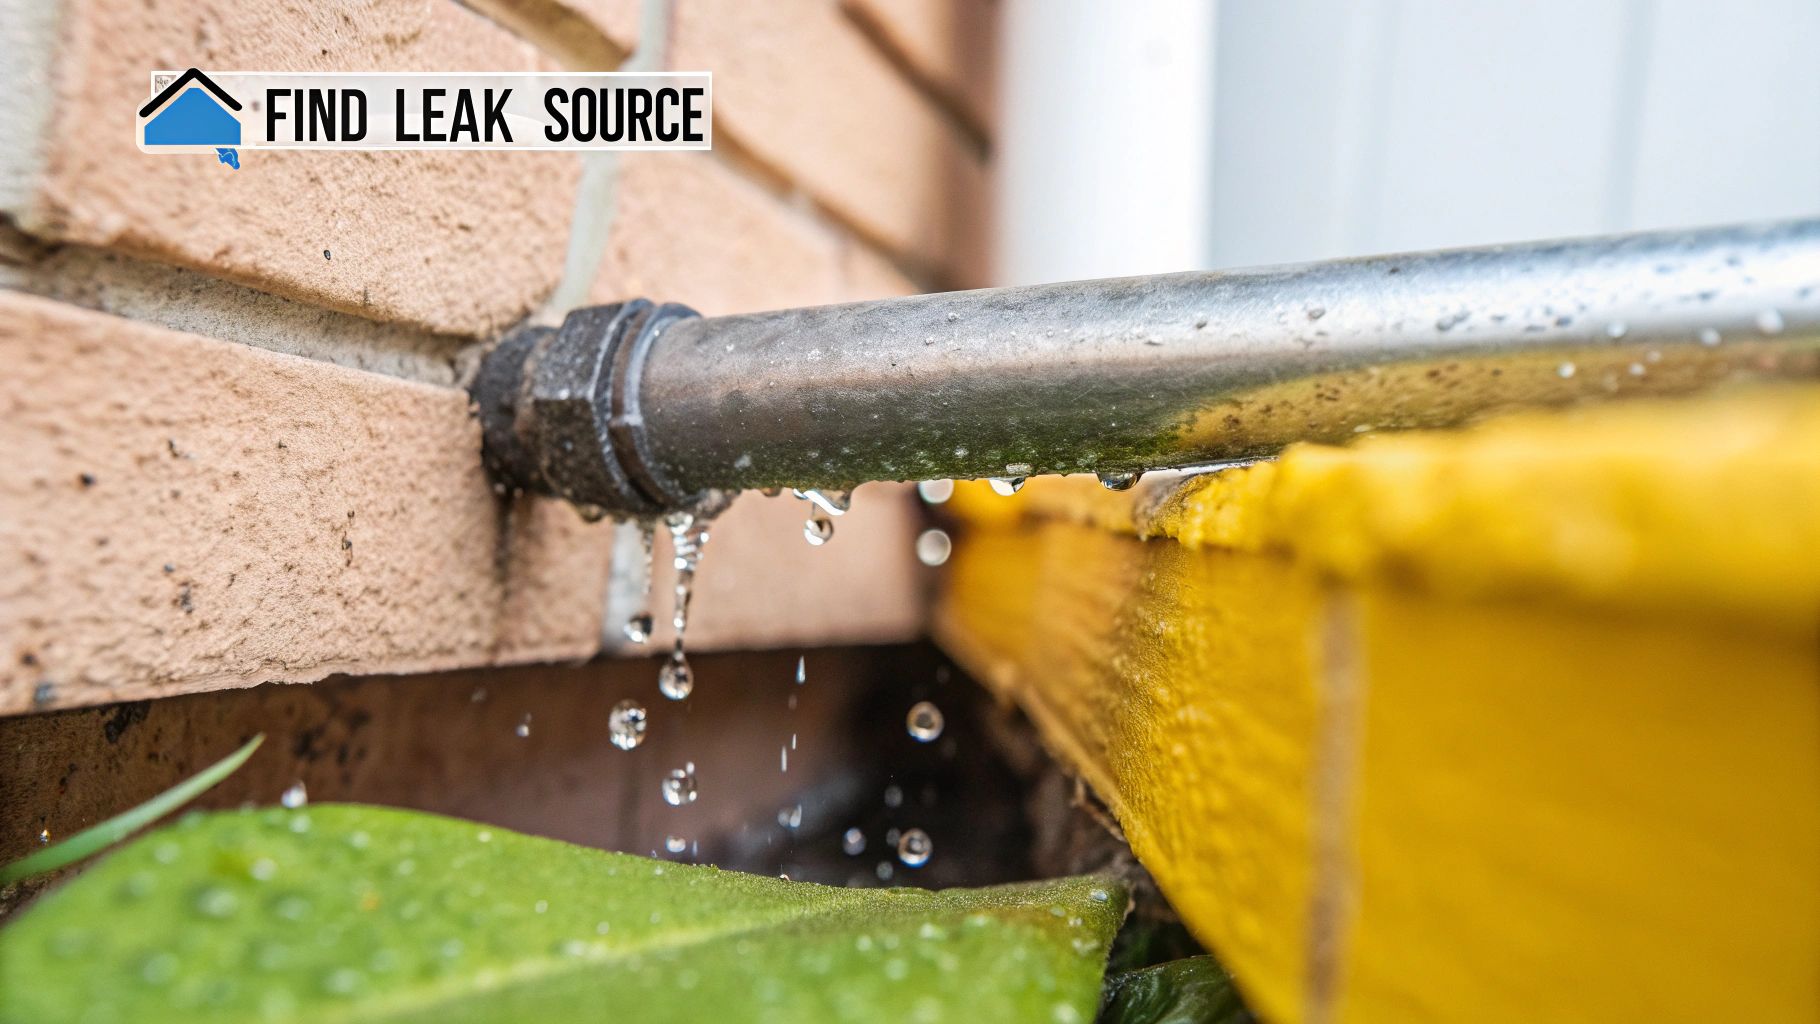
Before you even think about grabbing a wrench, the real first step in fixing a leaking sink drain is playing detective. You need to find exactly where that drip is coming from. More often than not, the culprit is something simple—a slip nut that's worked its way loose, a gasket that's seen better days, or a bad seal where the drain meets the sink basin itself.
Finding the True Source of Your Sink Drain Leak
A puddle under the sink is a dead giveaway you've got a problem, but water is a tricky thing. It loves to travel along pipes and joints, so the spot where you see it dripping isn't always where the leak actually is. I've seen plenty of people waste an afternoon replacing a perfectly good P-trap when the real issue was a loose connection much higher up. A few minutes of proper investigation will save you a ton of frustration.
The Diagnostic Process
First things first, clear everything out from under the sink. You need a clean, dry space to work. Toss a bucket or some old towels under the drain pipes to catch any water, then grab a dry cloth and wipe down the entire drain assembly. Start at the very bottom of the sink and work your way down the tailpiece and around that P-trap curve. Everything needs to be bone dry.
Now, for the easiest and most effective trick in the book: the paper towel test.
- Get the water running. Just turn on the faucet and let it flow for about a minute.
- Trace the water's path. Take a fresh, dry paper towel and carefully run it over every single connection, starting right up at the sink drain and moving down.
- Pinpoint the leak. The second that paper towel comes away damp, you’ve found your starting point.
This simple test tells you a lot. If you find moisture right under the sink basin, you’re probably looking at a failed seal on the drain flange. But if the wet spot is at one of the threaded connections, it’s almost certainly a loose slip-nut or a worn-out washer.
Here's a pro tip: Pay attention to when the leak happens. Does it only drip when you're running the water? That usually points to a loose connection. If you've got a slow, constant drip even when the sink is off, you might be dealing with a crack in the pipe.
Common Leak Locations and What They Mean
Knowing where the water is coming from is more than half the battle. This quick reference table can help you diagnose the problem based on where you find the moisture.
Common Leak Locations and What They Mean
| Where You See Water | Most Likely Cause | What to Check First |
|---|---|---|
| Dripping from the base of the sink drain | Failed plumber's putty or gasket seal | The large locknut holding the drain to the sink |
| At a threaded PVC connection | Loose slip nut or a bad washer/gasket | The plastic nut at that joint; try hand-tightening first |
| From the curved part of the P-trap | Loose connections or a crack in the trap itself | Both slip nuts on either side of the U-bend |
| Where the drain pipe goes into the wall | Worn-out seal at the wall connection | The fitting where the drain arm enters the wall stub-out |
Figuring out the exact spot prepares you for the specific fix you'll need, whether that's a quick tightening or a trip to the hardware store for a new part. This kind of proactive diagnosis is why the market for sink repair services, valued at around USD 2.5 billion, is on the rise. More and more homeowners are learning that fixing small plumbing issues early saves big headaches later. You can discover more insights about the growing sink repair market and what's driving it.
Gathering the Right Tools for the Job
Nothing kills the momentum of a weekend project faster than having to stop mid-job for a missing tool. When you're tackling a leaky sink drain, a little bit of prep work is the difference between a quick, satisfying fix and a frustrating afternoon. Trust me, getting everything you need before you even think about loosening a nut is the key.
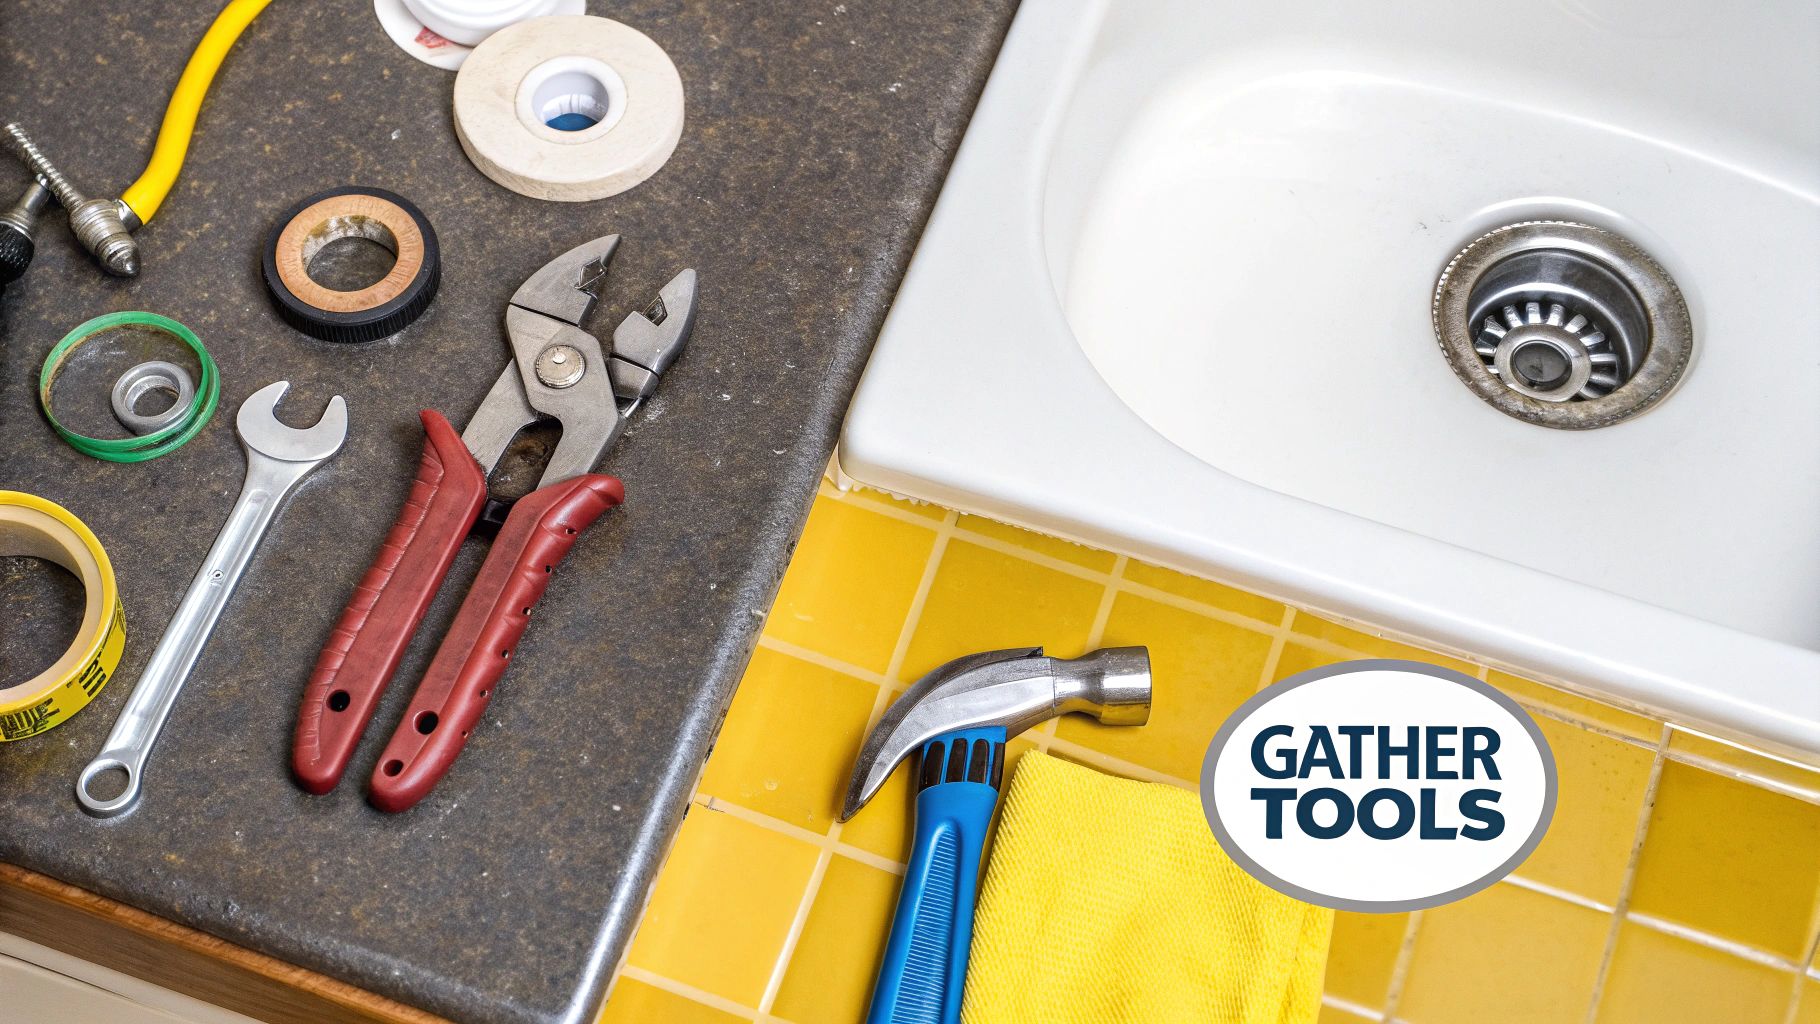
Before you dive in, grab a few basics. A bucket needs to go directly under that P-trap—that's non-negotiable for catching the water that’s inevitably sitting in there. I also like to lay down some old towels to protect the cabinet floor and for easy cleanup. And don't forget a good light source. It's dark under there, and a headlamp or a small flashlight makes a world of difference.
Your Essential Toolkit
The good news is that you don't need a professional plumber's entire van for this. Most leaky drains can be fixed with just a handful of common tools.
- Channel-lock pliers: These are the real MVP for this kind of work. Their adjustable jaws are perfect for those big slip-joint nuts on the drain pipes. One pair works, but having two is a pro move—one to hold the pipe still while you use the other to turn the nut.
- A small bucket and old towels: I can't stress this enough. They're your first line of defense against a mess.
- A stiff brush or sponge: You'll want to clean the gunk and old sealant off the threads before putting everything back together. A small, stiff-bristled nylon brush works great for this.
- Flashlight or headlamp: You can't fix what you can't see. Simple as that.
Having these items ready prevents the dreaded mid-repair run to the hardware store. It’s the single best way to ensure your project goes smoothly from start to finish.
Potential Replacement Parts to Have on Hand
It's also a smart move to have a few common replacement parts nearby. They’re cheap and can save you from a second trip to the store if you find an unexpected problem.
- Slip-joint washers: These little tapered rubber or nylon washers are the culprit 90% of the time. They get brittle and crack. A small variety pack is a fantastic investment.
- Plumber's putty: If you find the leak is actually coming from the drain flange inside the sink basin itself, you’ll need this to form a fresh, watertight seal.
- Complete P-trap kit: Sometimes, you'll find a crack in the plastic P-trap itself. If that's the case, having a new kit on hand makes for a quick and easy swap.
If you’re ever second-guessing the state of your plumbing before you start wrenching on things, don't hesitate to get a professional opinion. For anything more complicated than a simple drip, a detailed plumbing inspection can spot bigger issues before they turn into disasters. A little preparation goes a long way toward a permanent fix.
A Practical Guide to Fixing Common Drain Leaks
Alright, you've got your tools and you know where the water is coming from. Let's get to it. The good news is that most leaks under the sink are surprisingly straightforward to fix. They usually fall into just a few common categories. We'll start with the simplest fix and work our way up from there.
First thing's first: turn off the water to the sink. You really don't want an unexpected shower while you're working. The image below lays out the quick three-step process to keep things dry.
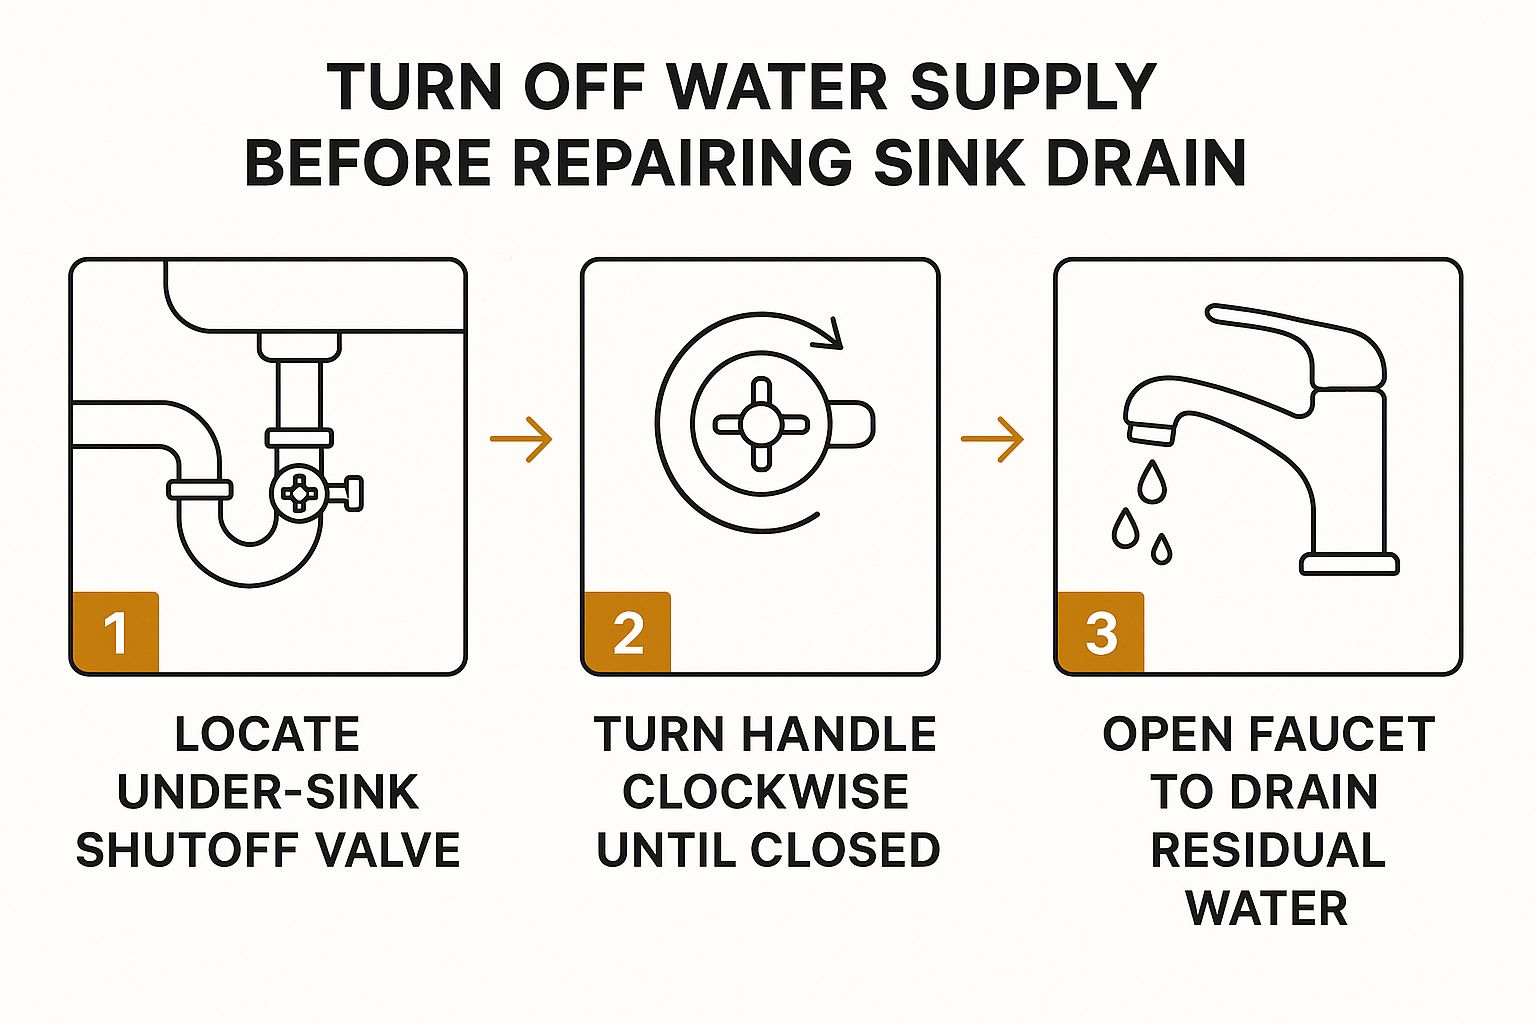
Just find the valve, give it a turn until it's off, and run the faucet for a second to drain any leftover water. This little bit of prep work will save you a big headache.
The Easiest Fix: Tightening a Loose Slip-Joint Nut
More often than not, a leak is simply a slip-joint nut that has wiggled loose over time. It's the very first thing you should check, and thankfully, it's the easiest fix.
See if you can tighten the leaky nut with just your hand. If it moves easily, you've likely found your culprit. Once it feels snug, grab your channel-lock pliers for one final, small turn.
A Plumber's Tip: Stick to the "hand-tight plus a quarter-turn" rule. I've seen countless people crank down on these nuts, especially the plastic ones, and end up cracking them. That turns a simple tightening job into a full-blown replacement. A gentle quarter-turn is all you need.
Replacing Worn-Out Washers and Gaskets
If tightening the nut didn't stop the drip, the next likely suspect is a worn-out washer or gasket inside that connection. These little rubber or nylon rings do all the sealing work, but they get old, brittle, and eventually fail.
Here’s how to swap one out:
- Stick your bucket right under the P-trap to catch whatever water is still sitting in there.
- Use your channel-lock pliers to loosen the slip nuts on either side of the joint you're working on.
- Slide the nut out of the way and gently pull the pipes apart. The old washer will either fall right out or be sitting on the end of the pipe.
- Pop in a new washer of the exact same size. Pay attention here: the tapered side of the washer needs to face the connection point to create a proper seal.
Put everything back together, tighten it using that quarter-turn rule, and you’re ready to test your work.
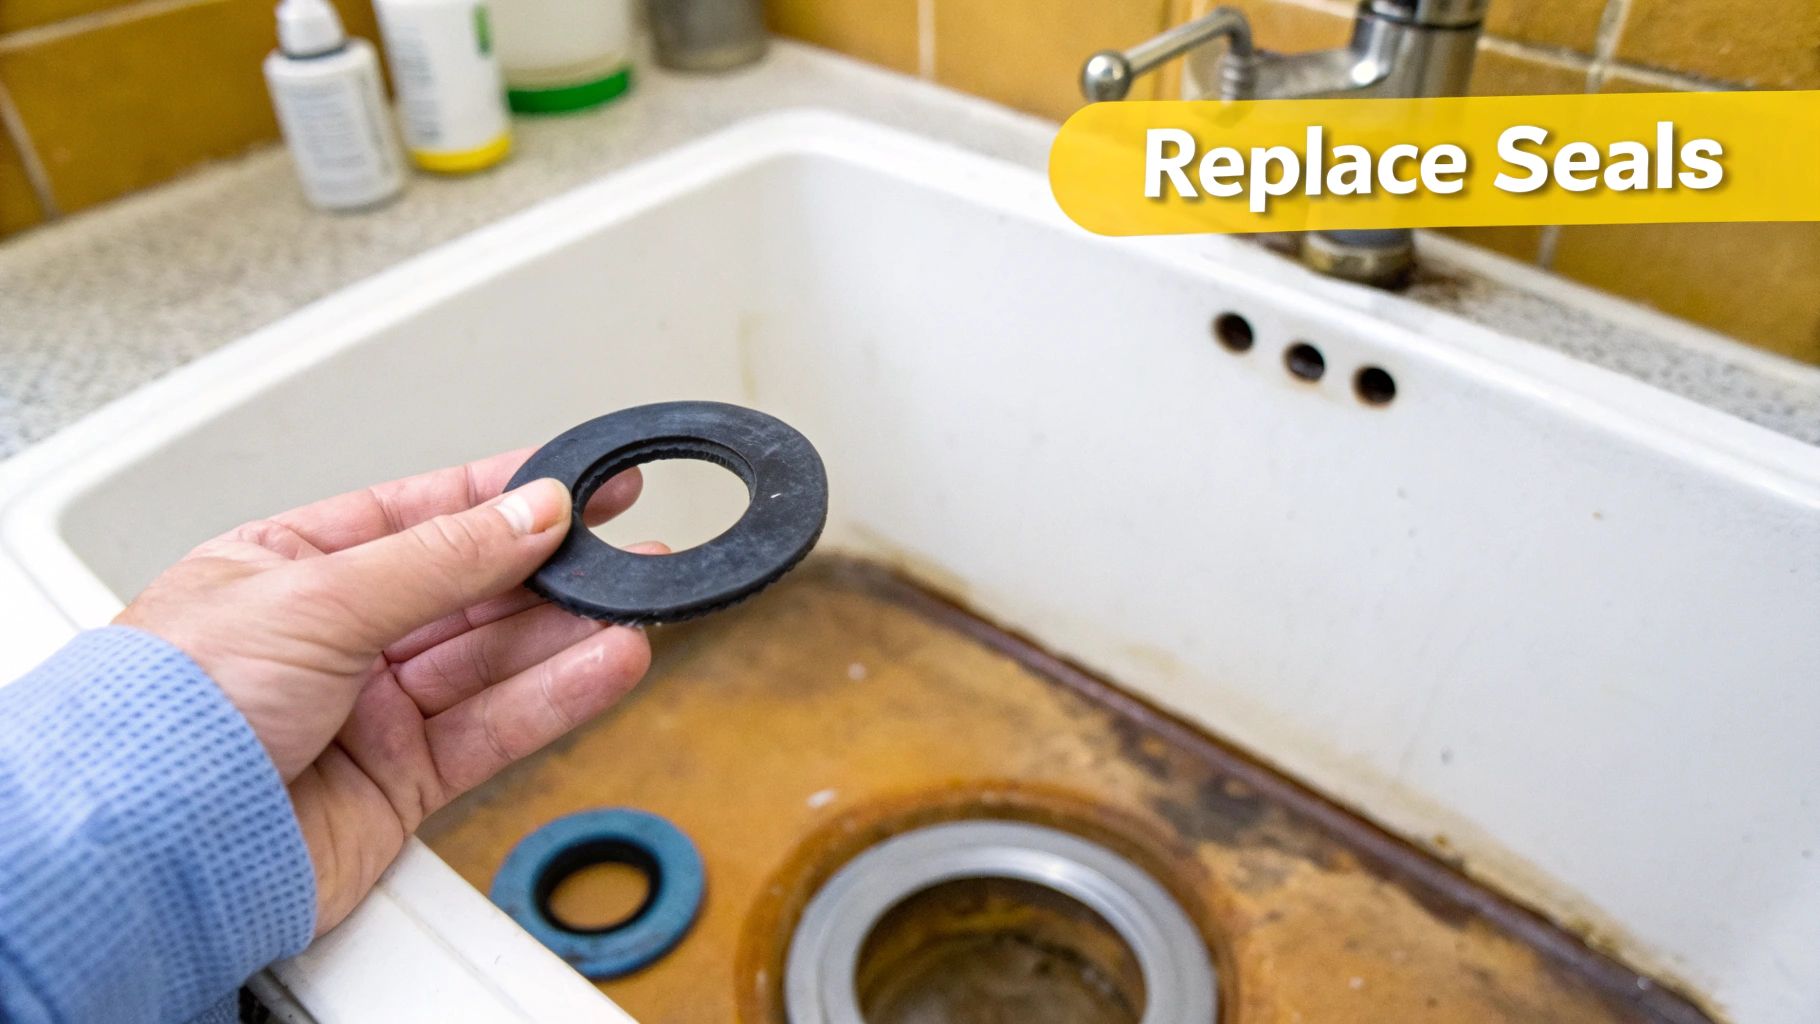
Resealing the Sink Drain Flange
Is the water coming from the very top, right under the sink basin itself? That's a classic sign of a failed seal at the drain flange—that metal or plastic ring you see inside your sink. Fixing this is a bit more involved; it means taking the drain assembly apart and applying fresh plumber's putty.
You’ll have to disconnect the P-trap and the tailpiece, then unscrew the big locknut that holds the drain body snug against the sink's underside. Scrape off all the old, crusty putty. Then, roll a new piece of plumber's putty into a thin "snake" and press it firmly under the lip of the drain flange before putting it all back together.
It's worth remembering that leaks aren't always just about loose parts. They can be caused by corroded pipes, degraded gaskets, and even blockages that put too much pressure on the joints. A persistent clog can stress these connections until they finally give way. The cost of a leak isn't just wasted water; it can lead to serious mold and structural damage over time. You can discover more research on sink repair causes and impacts to see how these small issues can escalate.
If you suspect a tough clog is the root cause of your leak, calling a professional is your best bet. For those stubborn blockages, it's wise to look into expert drain cleaning services to clear the line properly and prevent future pressure-related leaks.
What to Do When the Leak Just Won't Stop
So, you’ve done everything right. You tightened the nuts, you swapped out the washer, and yet, that maddening drip-drip-drip is still there. It's frustrating, and it's the point where a lot of people are tempted to give up. But hold on—when the simple fixes don't work, it usually just means the problem is a little more sneaky than you thought.
Most of the time, the issue isn't the connection you just worked on, but the parts you're trying to connect. A stubborn leak is often a symptom of a deeper problem that a fresh gasket just can't fix.
Inspecting for Hidden Damage
Sometimes, the source of a frustrating leak is a tiny flaw you could easily miss. You need to get a good look at the pipes themselves, especially if you're working with older plumbing.
-
Hairline Cracks in PVC: It's surprisingly easy to over-tighten a plastic slip nut and create a tiny hairline crack right near the threads. These things are often invisible until water pressure forces a bead of water out. A good trick is to dry the area completely and run your fingertip around the end of the pipe; you can often feel the crack before you can see it.
-
Hidden Corrosion in Metal Pipes: If you have older chrome or brass pipes, corrosion is your number one enemy. It can thin the metal from the inside, eventually creating a pinhole leak that looks like it's coming from a sealed joint. If your pipes have any discoloration or feel rough and pitted, that could be your culprit.
Another thing to check is simple alignment. If the drain arm coming out of the wall doesn't line up cleanly with the P-trap, it creates constant tension on the fittings. That sideways pressure can keep even a brand-new washer from seating properly.
Addressing Cross-Threading and Misalignment
One of the most common DIY mistakes is cross-threading a slip nut. This happens when the nut starts to screw on at an angle, carving new, damaged threads into the plastic. It might feel like it's getting tight, but it will never form a watertight seal.
If you think you might have cross-threaded a nut, back it all the way off and inspect the threads on both the pipe and the nut. If they look mangled or uneven, you've found the problem. The only reliable fix here is to replace the damaged pipe section and the nut.
Forcing misaligned pipes together is a recipe for a callback leak. Loosen all the slip nuts in the trap assembly and let the pieces hang naturally. If you see a major gap or a sharp angle, you might need a flexible extension piece or an adjustable P-trap to make the connection without putting stress on the joints.
Knowing When to Call a Professional
There's a line between a rewarding DIY project and a potential disaster. Pushing too far on a complex issue can quickly turn a small drip into a big flood and a much bigger repair bill.
Here are some clear signs that it’s time to pick up the phone and call a plumber:
- The water seems to be coming from inside the wall.
- The drain pipes are visibly corroded, flaking, or crumbling to the touch.
- You've tried all the standard fixes, and the leak is still there.
- You suspect the leak is caused by a severe clog deep in the system.
A serious clog, for example, can build up enough back-pressure to force water out of weak points or even burst an old pipe. A consumer-grade drain snake might not have the power or length to clear it. Professionals have tools for these situations, and you might want to learn more about what hydro jetting is to see how they tackle the toughest blockages. Sometimes, making that call is the smartest way to protect your home.
Don't Skip the Final Test: Making Sure Your Repair Holds
Alright, you've swapped out the faulty parts, tightened everything up, and put your tools away. It's tempting to call it a day, but we're not quite done. The biggest mistake I see people make is assuming the leak is gone without actually testing their work. You need to be sure it's a permanent fix, not just a temporary patch.
The best way to do this is with a simple pressure test. First, plug the sink and fill the basin all the way to the top with water. This puts the most possible weight and pressure on all those connections and seals you just worked on. Let it sit for a minute or two, then pull the plug.
As that full basin of water comes rushing down, grab your flashlight and a dry paper towel and get a good look underneath the sink. You want to watch every single joint and connection you touched. The paper towel is your best friend here—it will instantly show you even the tiniest, slowest seep that you might otherwise miss.
Building Good Habits to Prevent the Next Leak
Once you’ve confirmed your repair is bone-dry, the next goal is to make sure you're not doing this again in six months. A few simple habits can go a long way in keeping your drains clear and the cabinet underneath dry. If you do one thing, it should be this: stop using harsh chemical drain cleaners.
Those aggressive liquids are notorious for eating away at the rubber gaskets and plastic pipes in your drain assembly. They might clear a clog today, but they're making your plumbing brittle and prone to failure tomorrow. It’s a classic short-term fix that almost always leads to bigger, long-term headaches.
A proactive approach to drain maintenance is your best defense. Instead of reacting to a clog, you're actively working to prevent the conditions that cause both clogs and leaks in the first place.
Here are a few things you can start doing right away:
- Never Pour Grease Down the Drain: When you pour hot grease down the sink, it cools and hardens inside your pipes. This creates a sticky mess that grabs onto food particles and other gunk, forming the perfect recipe for a major clog that puts a ton of stress on your pipe joints.
- Get a Good Drain Strainer: This is such an easy one. A simple mesh or silicone strainer in the sink will catch all that hair and food debris before it has a chance to go down and cause trouble.
- Run a Hot Water Flush Monthly: About once a month, just pour a kettle of hot water (not boiling, just hot) down the drain. This can help dissolve any gunk or grease that's starting to build up.
Why a Quick, Regular Check-Up Matters
Finally, get into the habit of peeking under your sink every few weeks. It only takes a second. Just a quick scan with a flashlight can help you spot a bit of moisture or a tiny drip long before it turns into a cabinet-ruining disaster.
This kind of simple, preventative maintenance is catching on, and for good reason. The market for sink installation and repair is actually growing by about 5% CAGR as more homeowners focus on renovations and understand that good upkeep saves a lot of money down the road. You can see the full research on sink repair market trends and growth for yourself.
By catching a small issue early, you can often fix a leaking sink drain with nothing more than a quick turn of the wrench, saving yourself a whole lot of time and trouble.
A Few Common Questions About Sink Drain Repair
Even with the best guide in hand, a few questions always seem to come up when you're under the sink. When you’re trying to figure out how to fix a leaking sink drain, a quick, clear answer can be the difference between a job well done and a day full of frustration. Here are some of the most common things people ask.
Can I Use Teflon Tape on Plastic Drain Threads?
I see this one a lot. It seems like a logical fix, but you should absolutely avoid using Teflon tape (plumber's tape) on plastic drain pipe threads. That tape is designed for high-pressure water supply lines, not for drains.
Your sink drain uses what we call slip joints. These joints don't seal at the threads; they seal because a slip nut compresses a rubber or nylon washer, creating a watertight fit. Adding Teflon tape just gets in the way. It can prevent the washer from seating properly and can even cause you to overtighten and crack the plastic nut.
For drain pipes, the seal comes from the washer, not the threads. Stick with a good washer and the classic 'hand-tight plus a quarter-turn' rule.
Plumber's Putty or Silicone for the Drain Flange?
When you're sealing the drain flange (the metal or plastic ring inside the sink basin), plumber's putty is the go-to for a reason. It’s the industry standard because it creates a perfect watertight seal but stays soft and pliable for years. That flexibility is a lifesaver if you ever need to take the drain apart again.
Silicone, on the other hand, is an adhesive. It cures hard and creates a permanent bond. While that might sound strong, it’s a real headache down the road. You’ll have to scrape and pry to get it off, which puts your sink at risk of getting scratched or even cracked. Trust me, stick with plumber's putty for this job.
Why Is My Sink Still Leaking After I Replaced the Gasket?
This is easily the most frustrating part of a simple repair. You put in a brand new gasket, tighten everything up, and you still see that drip-drip-drip. Don't throw your wrench yet. It’s almost always one of three things:
- Misalignment: This is the #1 culprit. If the pipes don't line up perfectly straight, the gasket can't close the gap, no matter how hard you tighten the nut. Loosen the connections and let the pipes settle naturally to see if they're lining up correctly.
- A Damaged Pipe: Take a second to inspect the end of the pipe where the washer sits. A tiny, hairline crack or a rough edge from a previous repair is all it takes to ruin the seal.
- Washer Is In Backwards: Those tapered slip-joint washers have a right way and a wrong way. The narrow, tapered side should always face the fitting it's sealing against. Putting it in backward is a guaranteed leak.
Double-checking these small details usually solves the problem and gives you a lasting, drip-free repair.
If you’ve wrestled with it and the leak just won’t quit, or if you'd just rather have an expert handle it, Armor Hydro Jetting is ready to help. Our team provides fast, professional plumbing solutions to get your home back in working order. Contact us today for a reliable fix.